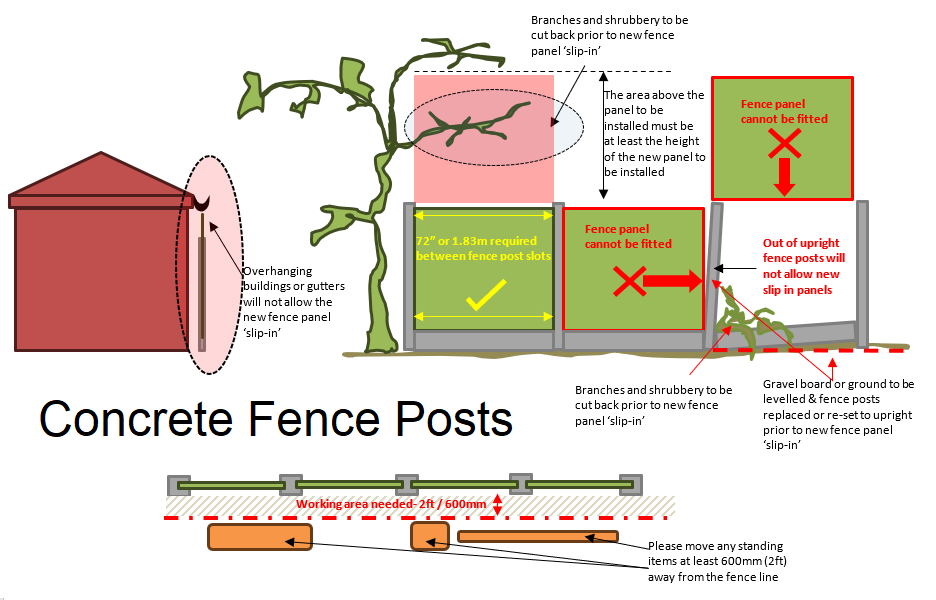
TERMS & CONDITIONS FOR 'SLIP IN' REPLACEMENT FENCE PANELS TO EXISTING CONCRETE FENCE POSTS
HAYMAC Installation Requirements and Exclusions:
1. HAYMAC are only undertaking replacement fence panels to the existing fence posts.
2. Any electric cables or pipework fixed to either side of the existing fence must be removed prior to the new fence installation commencing. If there are any trellis panels or decorative items fixed to either side of the fence which you wish to keep, please make sure these are removed prior to the works commencing.
3. Please clear both sides of the fence line of any standing items to allow 2ft/600mm of clear access along the fence line to be worked on.
4. To be able to remove and install your new fencing, our installers will possibly have to work within your flower boarders. If you have plants or shrubs that you do not want to get damaged, please ‘lift’ these plants and shrubs and re-plant them after the installation works have been completed. Our installers will make every effort to avoid damaging your plants and shrubs but sometimes this is not possible. HAYMAC will not be responsible for the replacement of, or financial recompense for, any damage to any of your plants or shrubs which are in the way of the new fence installation.
5. To be able to remove and install your new fencing, our installers will have to carry materials across your grass and garden, during periods of wet weather this may possibly cause some superficial damage to the grass or make its appearance ‘muddy’. Our installers will make every effort to avoid damaging your lawn but sometimes this is not possible. HAYMAC will not be responsible for the replacement of, or financial recompense for, any damage to your lawn or garden caused through the installation of your new fence or gate. If you are concerned about possible damage to your lawn, artificial turf or garden, please provide a suitable heavy duty covering to cover the lawn, artificial turf or garden where our staff will need to work or access the boundary line.
6. To be able to remove and install your new fencing, our installers will have to carry materials across your driveway and footpaths, during periods of wet weather this may possibly make its appearance ‘muddy’ as our installers will be working outside in your garden and their work boots will get unavoidably ‘muddy’. Our installers will make every effort to avoid making your driveway or footpath ‘muddy’ but sometimes this is not possible. HAYMAC will not be responsible for the cleaning of, or financial recompense for the cleaning of, your driveway or footpaths caused through the installation of your new fence panels. If you are concerned about your driveway or footpaths getting ‘muddy’ please provide a suitable heavy duty covering to cover the driveway or footpaths where our staff will need to work or access the boundary line.
7. Please ensure you have your neighbour’s consent to replace or repair the existing boundary fencing as we will need to work on both sides of the boundary line to install your new fencing. Please review & complete the attached form - HAYMAC Access To Adjoining Property Shared Boundary Permission Form.
8. It is your responsibility to ensure the fence posts are upright and in sound condition, existing gravel boards are level, or the ground is level and flat and that there is at least the height above the fence as the diagram above to ‘slip-in’ your new fence panels.
9. Please measure the height of the fence panel you have requested to be installed to confirm the height of the fence panel we have quoted for, prior to placing your order with HAYMAC. Complete our Fence Panel Check Sheet and return to HAYMAC.
10. Please measure between the fence posts to ensure you have an even 72” / 1.83m between the fence posts at the top and bottom of each fence bay to ensure your new fence panel will ‘slip-in’ between the existing posts. If the measurements between the fence posts at these 2x locations are not the same, it is highly unlikely a new fence panel will be able to be ‘slipped-in’ between the existing fence posts.
11. Any fence panel that cannot be installed due to faulty fence posts, adverse ground conditions, over hanging buildings / gutters or vegetation and trees will be set aside for installation at a later date, you will not receive a refund against the installation of this fence panel and will be charged for re-installing after the problem has been rectified. Any additional work we must undertake to complete the fence panel ‘slip-in’ installation will be priced for and agreed with you prior to carrying out the additional work.
12. If you have a fence panel that is not a standard width of 72” / 1.83m or a non-standard height (standard fence panel heights are- 3ft, 4ft, 5ft, 5ft 6” or 6ft) please let us know as we will need to make a bespoke fence panel to fit the correct gap or height.
13. Additional charges will apply for the manufacture of a non-standard size fence panel.
14. Items that are excluded from your quotation, unless specifically identified to the contrary:
Re-setting existing fence posts to upright.
Replacing damaged fence posts.
Re-levelling, re-fitting existing gravel boards.
Replacing existing gravel boards.
Excavating the ground to level & flat.
Cutting down a fence panel in width or height to fit the required gap between the fence posts.
Adding a batten to the fence panel to increase the width of the fence panel to accommodate a wider than 6ft gap between the fence posts.
Cutting back overhanging branches or shrubs.
Cutting back and clearing vegetation that breaches the fence line.
Removing rubbish from the fence line.
Moving standing items that are in the way of the fence line to give a minimum of 600mm (2ft) of working area.
Removing guttering.
Removing items that are fixed to the fence panels, for example electric cables, trellis panels or decorative items.
'Slip In' Fence Panel Requirements Diagram For Existing Concrete Fence Posts - click to view full size
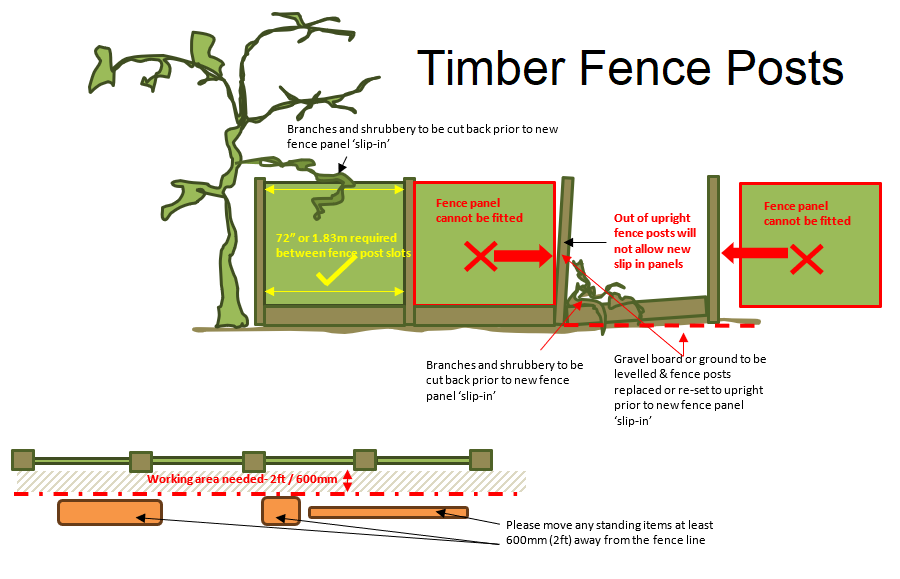
TERMS & CONDITIONS FOR 'SLIP IN' REPLACEMENT FENCE PANELS TO EXISTING TIMBER FENCE POSTS
HAYMAC Installation Requirements and Exclusions:
1. HAYMAC are only undertaking replacement fence panels to the existing fence posts.
2. Any electric cables or pipework fixed to either side of the existing fence must be removed prior to the new fence installation commencing. If there are any trellis panels or decorative items fixed to either side of the fence which you wish to keep, please make sure these are removed prior to the works commencing.
3. Please clear both sides of the fence line of any standing items to allow 2ft/600mm of clear access along the fence line to be worked on.
4. To be able to remove and install your new fencing, our installers will possibly have to work within your flower boarders. If you have plants or shrubs that you do not want to get damaged, please ‘lift’ these plants and shrubs and re-plant them after the installation works have been completed. Our installers will make every effort to avoid damaging your plants and shrubs but sometimes this is not possible. HAYMAC will not be responsible for the replacement of, or financial recompense for, any damage to any of your plants or shrubs which are in the way of the new fence installation.
5. To be able to remove and install your new fencing, our installers will have to carry materials across your grass and garden, during periods of wet weather this may possibly cause some superficial damage to the grass or make its appearance ‘muddy’. Our installers will make every effort to avoid damaging your lawn but sometimes this is not possible. HAYMAC will not be responsible for the replacement of, or financial recompense for, any damage to your lawn or garden caused through the installation of your new fence or gate. If you are concerned about possible damage to your lawn, artificial turf or garden, please provide a suitable heavy duty covering to cover the lawn, artificial turf or garden where our staff will need to work or access the boundary line.
6. To be able to remove and install your new fencing, our installers will have to carry materials across your driveway and footpaths, during periods of wet weather this may possibly make its appearance ‘muddy’ as our installers will be working outside in your garden and their work boots will get unavoidably ‘muddy’. Our installers will make every effort to avoid making your driveway or footpath ‘muddy’ but sometimes this is not possible. HAYMAC will not be responsible for the cleaning of, or financial recompense for the cleaning of, your driveway or footpaths caused through the installation of your new fence panels. If you are concerned about your driveway or footpaths getting ‘muddy’ please provide a suitable heavy duty covering to cover the driveway or footpaths where our staff will need to work or access the boundary line.
7. Please ensure you have your neighbour’s consent to replace or repair the existing boundary fencing as we will need to work on both sides of the boundary line to install your new fencing. Please review & complete the attached form - HAYMAC Access To Adjoining Property Shared Boundary Permission Form.
8. It is your responsibility to ensure the fence posts are upright and in sound condition, existing gravel boards are level, or the ground is level and flat and that there is at least the height above the fence as the diagram above to ‘slip-in’ your new fence panels.
9. Please measure the height of the fence panel you have requested to be installed to confirm the height of the fence panel we have quoted for, prior to placing your order with HAYMAC. Complete our Fence Panel Check Sheet and return to HAYMAC.
10. Please measure between the fence posts to ensure you have an even 72” / 1.83m between the fence posts at the top and bottom of each fence bay to ensure your new fence panel will ‘slip-in’ between the existing posts. If the measurements between the fence posts at these 2x locations are not the same, it is highly unlikely a new fence panel will be able to be ‘slipped-in’ between the existing fence posts.
11. Any fence panel that cannot be installed due to faulty fence posts, adverse ground conditions, over hanging buildings / gutters or vegetation and trees will be set aside for installation at a later date, you will not receive a refund against the installation of this fence panel and will be charged for re-installing after the problem has been rectified. Any additional work we must undertake to complete the fence panel ‘slip-in’ installation will be priced for and agreed with you prior to carrying out the additional work.
12. If you have a fence panel that is not a standard width of 72” / 1.83m or a non-standard height (standard fence panel heights are- 3ft, 4ft, 5ft, 5ft 6” or 6ft) please let us know as we will need to make a bespoke fence panel to fit the correct gap or height.
13. Additional charges will apply for the manufacture of a non-standard size fence panel.
14. Items that are excluded from your quotation, unless specifically identified to the contrary:
Re-setting existing fence posts to upright.
Replacing damaged fence posts.
Re-levelling, re-fitting existing gravel boards.
Replacing existing gravel boards.
Excavating the ground to level & flat.
Cutting down a fence panel in width or height to fit the required gap between the fence posts.
Adding a batten to the fence panel to increase the width of the fence panel to accommodate a wider than 6ft gap between the fence posts.
Cutting back overhanging branches or shrubs.
Cutting back and clearing vegetation that breaches the fence line.
Removing rubbish from the fence line.
Moving standing items that are in the way of the fence line to give a minimum of 600mm (2ft) of working area.
Removing guttering.
Removing items that are fixed to the fence panels, for example electric cables, trellis panels or decorative items.
'Slip In' Fence Panel Requirements Diagram For Existing Timber Fence Posts - click to view full size